
Use this as a placeholder preview until you add your final image.
Introduction
A good design does not always need complicated software. If you know the right size, use a clear layout and keep your text readable, you can create polished graphics directly in your browser.
In this beginner-friendly guide, you’ll learn how to create a instagram post design online, what size to use, what elements to include, and how to export a clean image when you are done. You can follow the steps in any modern editor, or open the Canvix editor and start designing right away.
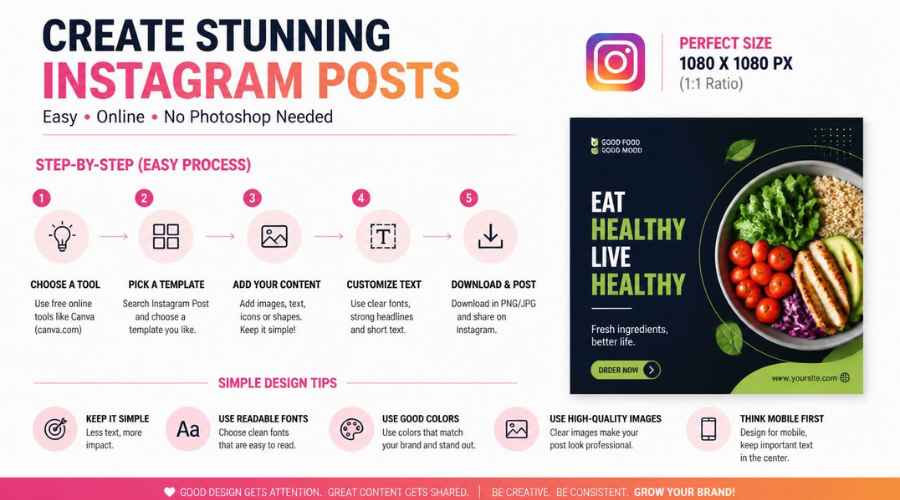
What Size Should an Instagram Post Be?
A good starting size for Instagram feed graphics is 1080 x 1080 pixels for a square post. If you want a taller post that takes up more space in the feed, use 1080 x 1350 pixels for a portrait layout. For wide landscape content, use around 1080 x 566 pixels.
For most branded graphics, announcements, quotes and simple promos, square or portrait works best. Portrait posts usually feel bigger on mobile, while square posts are easier to reuse across different platforms.
Step 1: Choose One Clear Goal
Before designing, decide what the post is supposed to do. Common Instagram post goals include:
- Announce a new product, video, blog post or offer
- Share a quote, tip, checklist or reminder
- Promote a sale or limited-time discount
- Show a before-and-after image
- Build a consistent visual style for your brand
Try not to fit everything into one post. One post should have one main message. If you have several points, create a carousel instead.
Step 2: Create Your Canvas Online
Open your editor and create a canvas. For a safe beginner layout, choose 1080 x 1080 pixels. If you want more vertical space, choose 1080 x 1350 pixels.
In Canvix, you can start from a blank canvas, upload your own image, search for stock photos, add text, insert shapes, use layers and export the final design without installing anything.
Step 3: Pick a Background
Your background sets the mood of the post. You can use:
- A solid brand color
- A gradient or soft abstract background
- A product photo
- A lifestyle image from a stock photo search
- An AI-generated background for a unique look
If your background is busy, add a semi-transparent overlay before placing text on top. This improves contrast and makes the design easier to read.
Step 4: Add Short, Readable Text
Instagram users scroll quickly, so your text needs to be easy to understand at a glance. Use a short headline, a smaller supporting line and a clear call to action if needed.
- Use 3–8 words for the main headline
- Use bold fonts for important words
- Keep text away from the very edges
- Use strong contrast between text and background
- Avoid tiny paragraphs unless the post is meant to be saved and read
Step 5: Add Images, Icons or Shapes
Small design elements can make a simple post feel more finished. Use circles, lines, arrows, icons, stickers or product cutouts to guide the viewer’s eye.
If you are making a product announcement, place the product image on one side and the text on the other. If you are making a quote image, keep the design minimal and let the typography do most of the work.
Step 6: Keep Your Brand Consistent
A single Instagram post can look nice, but a consistent feed looks professional. Reuse the same fonts, colors, spacing and layout style across multiple posts.
You can also create a reusable layout, then duplicate it whenever you need a new announcement, quote or tip post.
Step 7: Export and Upload
When your design is finished, export it as a JPG or PNG. JPG is usually fine for photos and general posts. PNG can be better for graphics with sharp text, logos or transparent elements.
Preview the design on mobile before posting. Make sure the text is still readable when the image is small.
Common Instagram Post Mistakes to Avoid
- Using too much text in one image
- Choosing low-contrast colors
- Placing important content too close to the edges
- Using blurry images or stretched photos
- Changing fonts and colors too often
Related Design Guides
Once you have created your instagram post, you can use the same skills to make other graphics:
Conclusion
You do not need Photoshop or advanced design experience to create a clean instagram post. Start with the right canvas size, choose one clear message, use readable text, keep the layout simple and export your final design as a JPG or PNG.
Templates, stock photos, uploads, layers, effects and AI backgrounds can all speed up the process. The more you reuse a consistent style, the faster your graphics will look polished and recognizable.
Ready to design your own? open the Canvix editor, choose your canvas size and start creating online.
